Saturday, November 21, 2009

Norman Bates

My husband and I love Hitchcock's movies. We have pretty similar tastes, but this is one of the genres we can always agree on. I adore images from old movies, the pop-culture feel they have, and thus I was pretty stoked to work with this image from Psycho:


Psycho scared the poop out of my when I was a kid. I was totally into the whole movie, and good to go, no worries with the whole shower scene and murder...but when Norman Bated had that internal monologue in the epilogue of the movie, where he's his mother...and then I realized that all those conversations in the movie he had with his mother were really just him...my poor 10-year-old brain couldn't quiet handle it. But I KNEW I was fascinated by it.

Anyhow, there's no scene to quite capture that weirdness like this one, when Norman realized that his "mother" has killed Marion. I took that picture and cranked up the contrast:


Then added a little photoshop static for fun.


And then silkscreened it with a touch of blood-red for some psychological effect.


 Love, love, love.


Which brings me to a fine point I have been debating...the issue of copyright. I have trouble finding information about the current copyright of Hitchcock's films (I think they were re-issued to someone in 1997), but I don't know if that counts for things like screenshots from the films. And if you change the screenshots by altering them and adding awesomeness (see above), can you skirt around copyright issues? My guess is no, but there's no good guide out there for these things. I really want to do some art based on old movies or characters...but I have a hunch it's illegal. Anyone out there with any information about this?

In the meantime, I shall love Norman.

Architectural Linocut: From Photo to Print

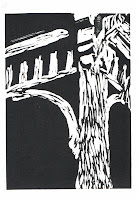
One of my most exciting product this morning was a linocut that I've been working on from one of my own photos (which I mentioned in this post). I thought it would be a neat idea to show the progression from photo to print:


Obviously, there is that pesky image flip, which is sometimes jarring when you pull the print, but even taking that into account, I really love seeing the way an image can evolve. And I feel good knowing that from start to finish, the image was mine, not something I took from somewhere else. What a thrill!

A Prolific Morning

I tend to jump into endeavors with full enthusiasm. When I took pottery classes in college, I produced a TON of pottery...enough to give away for several Christmases. It was so very Zen for me that I just couldn't stay out of the studio. I wouldn't say I was good at pottery -- I was ok. But I can say I was prolific.

I'm beginning to feel the same way about printmaking -- I can't say I'm good (yet), but this morning I had a very prolific morning. I did some silkscreening with mixed results, and printed a bunch of my linocuts. It was very peaceful to be on Thanksgiving vacation and doing something just for me.

In other news, I SOLD two of my prints this week! One of them was to a family friend, which was awesome, and the other was to a strange, which was much more unexpected. There's not a lot of variety in my etsy shop as of now, but I figure if I put a piece or two in a week, there will be a substantial collection in time! What is does have is a lot of different versions of the same prints as I experiment with different techniques.

Friday, November 20, 2009

Silkscreening

In our class on Wednesday night, we worked on silkscreening for the first time. I think it's a process that is draws a lot of printmakers. It's pretty versatile, you can work in many different sizes, and there's a lot of freedom about what kind off images you use, since preparing the screens (especially using a photo-emulsion method) is pretty easy. Hence, the images can be more complex than some other methods of printmaking.

I worked on an image of Norman Bates from Psycho, and I have a couple other screens made, one of my own photo (the one with the light and the chair which I posted in my last blog) and one of Martha Graham. I haven't printed these last two images yet, though. I'm planning to go pick up the images of good ol' Norman today, which I'll post before I leave for Thanksgiving.

In all honesty, I did not totally love silkscreening. For one, our teacher pre-prepared all the screens so they were ready to be developed with our images, so we missed out on a big step of the process and I don't really know how to recreate it. Second, the screens are pretty unwieldy, and it's a pain to print and image, wash the screen, dry the screen, print an image. Third, I seen to have a deficient skill for dragging the squeegee. I'm sure it takes practice, and I know that there are likely some really awesome uses for silkscreening, but I really appreciate the methods of printmaking and lend themselves to making multiple prints pretty quickly for practice.

I plan on going into the studio today or tomorrow, and will do some further experimenting, and print my other two screens. Who knows...maybe I'll end up loving silkscreening,. For now, though...eh.

Monday, November 16, 2009

"Cheating" in Printmaking: The Use of Photos

I have this idea in my head that "real" artists don't have to use things like photos to come up with images. I don't actually mentally believe that this is the case. But sometimes my gut and my head don't listen to one another. I'm starting to feel better about using photos, especially when they're my own. That, at least, seems slightly more legit to me.

I was digging through old photos the other day. I recently switched to a new computer, and so some of my old photos aren't yet switched over. (I thought they were, but the transition didn't go smoothly, and some of them are as-of-yet inaccessible on the new computer). Nonetheless, I found a few that, when put into high contrast, which is necessary for most kinds of printmaking, look pretty awesome and appropriate for various processes.

Case in point: This picture was taken on our honeymoon at our B&B in Montreal. The lighting is less than perfect:


But when put into high-contrast...Totally interesting.


I think I have a new picture for my upcoming silkscreening lesson. Because the other ones I have are copyrighted images of Martha Graham and Norman Bates. Which are amazing and awesome and may still be made, but probably technically aren't legal.

My next linocut inspiration:


And my next-next linocut...for when I get brave:


Thursday, November 12, 2009

Printmakers....HELP!

I have questions. Issues. And no printmaker friends to ask. Questions such as:

1. Why can't I get a good even roll of ink on my linocuts? Is it the (water-based) ink I'm using? Is this the "look" of a linocut? When I look at awesome and beautiful linocuts online (like this one, and this one), they don't have weird differences in inkage on their prints. Why? What am I doing wrong? What is the proper technique?

2. Why is linoleum so freaking hard to cut? Is this normal? Am I weak? (Yes, I know the ironing trick. It is awesome. And seems like cheating.)

3. How do "series" work? If I'm pulling several prints from the same block or etching, how do I number them?

There are more. Always more. Any printmakers out there who can offer their sage wisdom and advice? HELP! Send them my way!

Wednesday, November 11, 2009

Adventures in Printmaking: Etching

Because I don't own a tool that will cut into plexiglass, at the moment I need to do any etching work at the studio.

Etching shares some aspects of linocut, in that you cut into a medium to form your image. What is different, however, is that in etching, the part you carve is the inked part of the final image, but in linocut or woodcut, the part you carve is the white or negative part of the image.

Tonight I started with some sketches of a tree, but they quickly turned into a much more graphic print of a wave. After creating the original image, the next step is using a super-sharp tool (which likely has a super-technical name I don't know) to cut into a piece of plexiglass that is placed over your image. Afterwards, you have a nice etched image.


After that, it's a trip to the cabinet to dig out the etching ink. I was lucky enough to find blue ink this week, which I thought appropriate to use with my wave. You take the ink out of the jar (which is likely cakey and gross if you are using ink at the public studio) and rub it into the lines you've etched with a cloth called a tarlatan. You employ the tarlatan to work the ink into the lines, and then use another (clean) portion of the cloth to wipe the plexiglass clean so that only the lines have the ink in them.


For etching, you have to use paper that is wet. Since the ink is worked into the tiny etched spaces, the water helps to draw it out of the plexiglass grooves. You blot the paper with two gianter pieces of blotting paper, and then set it all up on the press.


The first print was clean with nice crisp lines. For the second go, I went with a different look as I prepared the plate:


When I wiped off the plate after working the ink into the etched grooves, I decided to leave some of the ink on the plate instead of wiping it completely clean.  It struck me as misty and ocean-wave like. I quite enjoy the effect!


Watercolor backgrounds

Tonight was a super-productive evening in the print studio. When I arrived for class, all ready for the collograph lesson, I was taken back to the days of college, with a handwritten note taped to the door: "George had an emergency. You're welcome to stay and work." So I did.

None of my classmates showed up tonight, so perhaps it was best that George wasn't there. I was kind of stoked to have some free time in the studio, and I set to work printing up some of the things I've been working on this week at home.

I mentioned watercolor in my last post, and that was the name of the game for the first few prints. I've had a couple of linocuts going, and I prepared some watercolor backgrounds for them before I went in today:


I wasn't sure if the white block printing ink was going to be bright enough to show up on these backgrounds, but I decided to give it a go. I had prepped the blue/brown backgrounds for St. Joe, and rolled him up first. The result?


Awesomeness.
( By the by, I decided to add St. Joe's name at the bottom. I think it was a good choice.)

I also rolled up a plain old black copy of this same linocut, which also turned out well. As soon as it's dry and I can scan it, I'll have it up in the cafepress shop (ahem....Mom).


I've also been working on a quirky little scene of my own. This is the first linocut I've worked on that has come entirely from my head, instead of being worked from a pattern or picture. Here's the linoleum all inked up:


I printed her on a watercolor background, which was slightly less successful than with St. Joe, but not bad:


And I gave her a straightforward printing, too.


I still need to get a really fabulous black and white print, but it's a good start.

Lessons learned:
1. I still need to work on the right method for rolling up a set of lino prints. The ink gets dry and sticky fast, and I'm not sure exactly how to handle it. I think that oil-based would be better to work with, but will also deteriorate my linocut faster, which I'm not interest in at this point in my printing education.
2. I LOVE the watercolor background, but I need to either go really dark and print in white, or really light and print in black. These are easy changes to make.

(All of the images in this post are just pictures, not scanned versions of the artwork. Once they dry, I'll try to post some of the final products, which will be a bit clearer!)

Monday, November 9, 2009

Mixed Media: Etching and Watercolor...(or For Psychologists or Zombies II)

Finally, my quest to mix printmaking and watercolor has been successful!


It's not the best piece I've ever done, but it opens the door to a whole new realm of possibility with mixing the etching and watercolor. Much experimenting shall follow!

More watercolor fun to follow...I've got some watercolor in the work for good ol' St. Joe. More to come later this week.

New linocut done today, too -- the first totally of my own design (previously, I've been working from photos or other pictures/designs I've found.) I'm excited to print it up this week. What a productive evening this has been!

Sunday, November 8, 2009

For Psychologists or Zombies

Soon to come will be a step-by-step process post about etching. For the time being, I would like to display the fruits of my first etching:


Things that I love include the sweet raised edge on the paper where the plexiglass imprinted and the murky inkiness where I didn't wipe off all of the etching ink (on purpose). I love the old-school antique-y look when there is leftover ink on the glass.

This week, experiments with watercolor on etching. I know, I know, you may be thinking, "Right, watercolors worked so well for you in the past on the red mixer print." Ha! I say to you. This time it shall be different, because the etching ink is oil-based. Or, at least, that is my hypothesis and deep, deep hope.

For those interested parties, there are a few shirts, buttons, and kids' clothes available with the brain in the Whole Wide Room Cafepress Shop, as well as a few other new designs, like my monotype human heart. I'm really into the anatomy illustrations lately. Maybe I'll work on a series...

St. Joe Returns

Last Monday, on the same day as the middling success with the red mixer, I printed a couple prints of the St. Joe linocut I've been working on. So far, so good, I think!


Words may appear this week. Maybe. This is one of those moments where I decide whether it's time to stop...or keep going.

Thursday, November 5, 2009

Adventures of the Red Mixer #867: Coloring Trial and Error

On Monday, I went to the print studio after work and created a set of outline-less stand mixers using oil-based paints.


On Wednesday, with happy anticipation and stubborn determination, I returned to add the linocut outline of the dear mixers. I lovengly lined up all seven prints...


...and then pulled them one by one. When I had finished, I had lying in front of me:


One print that was over-inked


Two prints that were blurry and made me feel as if my eyes were dilated at the optomestrists'


Two prints on which the red was not dry and so the black ink did not transfer onto the paper


And two prints that turned out respectably


Lessons learned:
1. If trying to color a linocut with oil paint, let the oil paint dry. Completely. Not mostly. Completely. Really. Even if it takes a week and I'm impatient.
2. Perhaps the old ink at the print studio is a bad quality. This would not shock me.
3. Linocuts don't tend to do well when run through the press more than once per print. I think that's where the blurriness came from.
4. 2/7 is not a ratio I'm ok with. Must keep learning.

Tuesday, November 3, 2009

The Red Stand Mixer

I have a vision of a tomato red stand mixer linocut print, like the awesome "rite of passage" appliance I have sitting in my own kitchen down the hall. Alas, attempts to achieve said red mixer have proven futile thus far.

At first, I thought I could just monotype some red oil paint on top of the prints I made from the linocut. This wasn't altogether unsuccessful, as shown previously, but it removed some of the clarity of the black outline, which I'm not ultimately willing to compromise.

My next thought was to simply paint the print with watercolor. Turns out that since the ink we use for the lino prints is water soluble, then the watercolor paint just makes the black ink run, which does a real number of the crimson paint I attempt to add. Strike 2.

Yesterday, I monotype printed some red mixer shapes, and tomorrow I will try to line up the linocut over them to provide an outline. Best case scenario, they line up perfectly, problem solved. Middling scenario, they don't line up perfectly, but the effect is awesome. Worst case scenario, they don't like up perfectly and look like poop. (Even if the worst case scenario plays out, I will OWN those linocuts and love them as the fruits of my labor).

Any printmakers out there with amazing suggestions for adding color to linocuts? I thought about simply using oil-based ink so that I could in fact watercolor the prints, but the argument our teacher had against that was that using mineral spirits to clean the lino block would deteriorate the linoleum and make it useless faster. For a pro who is making just one run of prints from the block, this might be totally fine. But for someone just finding her way in the world of printmaking...I would like to save my linocut as long as possible so I can continue to experiment with it.

More news to come...

Sunday, November 1, 2009

Work in Progress or St. Joe is My Homeboy

Today is the feast of All Saints, where we Catholic folk (and perhaps other Christian religions, too -- I don't mean to be exclusive!) celebrate and honor all those who have died and made their way up to heaven. This includes the official canonized saints, and the unofficial saints, the ordinary people who made small differences in our lives that we remember. 


Growing up Catholic, I was surrounded by the saints in imagery, prayer, and books. The gave me a great deal of comfort and guidance. The notion of a patron saint for different people, places, and contexts is extremely comforting to me: St. Anthony helped us find parking spaces and lost items, St. Germaine, my patron through confirmation, reminded me of humility, St. Cecilia guided my love of music, etc, etc. 


One saint who has literally surrounded me throughout a vast majority of my life has been good old St. Joseph. He gets a lot of mention, as a part of the Holy Family, but not always a lot of credit, in my humble opinion. I mean, think about it - he had to raise and discipline Jesus. Good Lord, can you imagine? 


My tiny home parish, where my heart will forever lie, is St. Joseph's, and while I was growing up, it was made of a small number of families and many familiar faces. I made my first communion and confirmation at St. Joe's, and have many warm memories of the small church packed to the seams on Christmas Eve and Easter. The priests who resided at St. Joe's throughout my life have been wonderful men, and a couple were (and are) close family friends. 


In my adult life, I feel fortunate and grateful that St. Joe seems to be watching out for me as I begin married life. When Andy and I looked for a parish here in Vermont, we thought that St. Joseph was the closest to his then-apartment. It turns out that there is actually another small parish up the street, but we didn't find that out until much later, and became parishioners at this St. Joseph. I feel as if there is a beautiful kind of symmetry to the fact that I was married at St. Joseph's, a parish under the same patronage as the one I left back home. I believe St. Joseph is a special patron saint of my marriage -- perhaps not official honored as such, but in my mind, he's looking out for Andy and I the way he did for his own small family.


And so, on the feast of All Saints, I present to you all my tribute to the man himself, earthly Dad of Jesus -- in lino print style.


I began yesterday by printing out a pic of St. Joe that I would use as the basis for my lino cut.


I searched the print studio, and came up with a piece of tracing paper that I taped over the image, and used as a guide to determine which chunks of the picture I would remove on my lino block, appearing white on the print, and which parts would remain in the block and appear as black. This isn't as easy as it sounds -- despite the fact that it's a black and white image, there are a lot of shades of grey that don't exactly work when you're dealing with a two-toned operation like this. The final tracing appears below, along with a makeshift piece of "carbon paper" that I created by rubbing a lot of pencil on a sheet of blank paper:


Now, the challenge: transferring the pencil image onto the linoleum so I can carve along some pre-determined lines. Like I mentioned in the last post, linoleum printing involves some challenges because, well, you can't see through it like you can with other mediums used for print-making. So transfer of images is necessary. In this case, I turned the "carbon paper" upside down onto my linoleum surface:


Then, I taped my traced image on top of the upside-down carbon paper, and traced with a pen over the outlines of the areas I would remove:


Then, the reveal...


At this point, the most tedious task, the carving, is up next. I dug in last night, working from the top down, and plan to continue more tonight. Printing should occur this week!


Have a peaceful All Saints, friends!